Many people don’t know the amount of time and effort that is put into frame geometry and why it matters so much. I will go over each measurement on a frame and briefly explain what purpose it serves and how it affects the handling or fit of the bicycle. This is a brief overview of geometry, I will be adding more resource pages about how this applies to certain riding styles and types of terrain being ridden.
If you would prefer to watch a video, check out my explanation of geometry on YouTube.
If you would rather read about it, continue down below as I go through each geometry measurement and explain what it is and how it affects the bike.
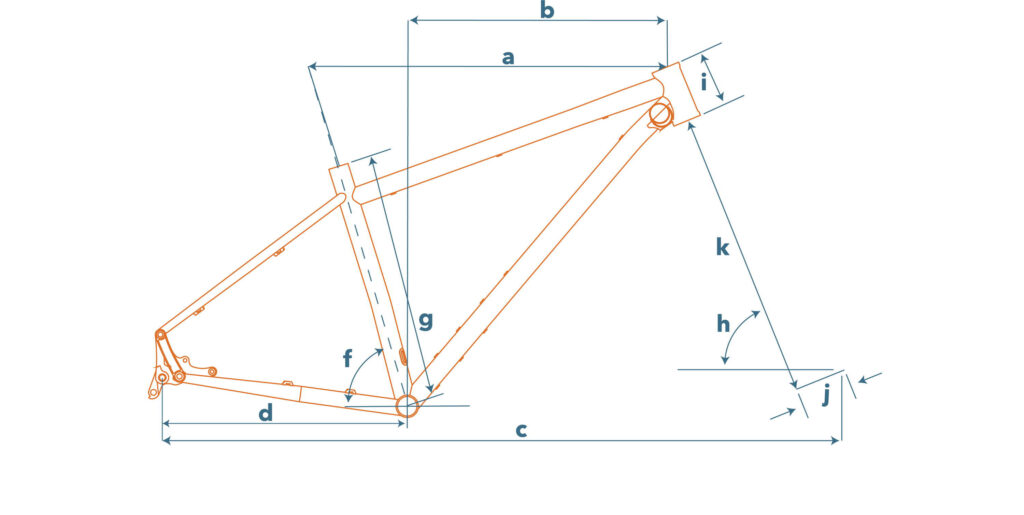
Effective Top Tube (a) is the horizontal measurement from the center of the head tube to the center of the seat tube if you extend the angle until it meets the horizontal measurement. This matters because it is the distance your butt on the seat will be from the center of where the stem mounts to the fork. This basically determines how far the handlebars will be away from you when you are seated. If the bars are too close you will be too upright and more of your weight will be on the seat than ideal. If the bars are too far forward your body will be angled forward and too much weight will be distributed to your hands and arms.
Reach (b) is the horizontal measurement from the center of the bottom bracket to the center of the head tube. This determines how far away you are from where your stem clamps to the fork steerer when standing. This matters because it will determine how close you are to the handlebars while standing. If the reach is too long you will not be centered on the bike and your weight will be too far forward on the bike while standing. This can cause you to be nose heavy when in the air or riding technical features making it harder to keep the front end up. If it’s too short your knees will be too close to the bars and your weight too far back causing you to more easily loop (flip) backward.
Wheelbase (c) is the distance between the axles. This is determined by all the other measurements on the bike and is something not worth focusing on. If you get all the other measurements correct, including fork offset, the wheelbase will naturally fall to where it needs to be.
Chainstay Length (d) is the distance from the center of the bottom bracket to the rear axle. Often times there is a range because many frames have adjustable rear dropouts (sliding dropouts or horizontal slotted dropouts). The longer the chainstay the harder it is for the front end to come up. This is good for climbing and keeping the bike stable and planted, but not ideal for jumping and technical riding where you need to be able to pull up the front end to help get over stuff. A shorter chainstay causes the front end to come up easier. This helps with technical riding and jumping, but can make the front end want to lift up during steeper climbs.
Bottom Bracket Drop (not shown) is the amount of drop measured from the center of the bottom bracket to a horizontal line between the front and rear axles. This determines how low the crankset is in relationship to the rest of the bike. The lower the bottom bracket the closer your pedals will come to the ground. A lower bottom bracket also puts you more into the bike and makes it more stable for digging into corners. A higher bottom bracket puts you up higher on the bike and helps the bike become more playful and easier to maneuver around. The chainstay length and the bottom bracket drop can be adjusted together to help offset some of the effects from the other. For example, if the chainstays need to be longer due to wanting more tire clearance for larger tires, the bottom bracket can be raised slightly to help make the front end easier to pull up.
Seat tube angle (f) is the angle in degrees of the seat tube. This is the degree angle measured from an imaginary line drawn from the center of the bottom bracket where the seat should end up. On bikes where the seat tube isn’t in alignment with the bottom bracket, sometimes if curved for more rear tire clearance or out of alignment on many full-suspension bikes. On those bikes, the final height setting of the seat will determine the seat tube angle. This will determine how far forward or back of the bottom bracket the rider will be while seated. More forward helps with climbing and front tire traction in turns while seated, but too far forward can make your pedaling position less ideal for your legs, especially your knees. Further back and more traction is applied to your rear tire, but the front end will want to come up easier during climbs.
Seat tube length (g) is the height of the seat tube from the center of the bottom bracket to the top of the seat tube. This used to be the old way to measure mountain bikes, but modern bikes have shorter seat tubes to help accommodate longer dropper posts so more range of drop is allowed. Too high of a seat tube and you can’t have much range in a dropper post. Too low and your post is too long and not as strong.
Head tube angle (h) is the angle in degrees of the head tube. This determines how quickly a bike steers. The slacker the head tube angle, the slower the bike will steer. The benefits of a slacker head tube angle are more stability of the bike, especially as speeds increase. It does require the bike to be leaned further in order to make tighter turns. Also, a slacker head tube angle makes the wheelbase longer thus making it harder for the bike to make tighter turns. A steeper head tube angle makes the bike steer quicker and helps the bike maneuver at slower speeds. Steeper head angles are less stable at higher speeds and they also will shorten the wheelbase and make the bike easier to turn in tight areas.
Head tube length (i) is the height of the head tube where the fork steerer is mounted. This affects stack height (not in the image) which is the distance between the center of the bottom bracket to the horizontal line (a) in the image. A longer head tube will add to the stack height. Bottom bracket drop and head tube length work together to determine stack height. It essentially makes the front end of the bike lower or taller before bars and stem are added. Lower makes you lean farther forward and taller makes you more upright.
Fork offset (j) is how far forward the front axle is from the main steering line going down the center of the steerer tube or head tube (k). This is an adjustment made based on many other factors of the bike such as head tube angle to make the bike steer as naturally as possible. It affects a measurement called trail which can get complicated to explain. Essentially the bigger the offset the less trail a bike will have and the shorter the offset the more trail the bike will have.
Fork length (k) is how tall a fork is from the center of the front axle to the bottom of the head tube. This is important because all of the measurements above will change based on whether the front end is raised or lowered. The amount of front suspension the frame is designed for will determine the ideal fork length for that particular frame.